
Here are 6 Steps for How to Make an App:
- Market Research
- Sketch and Layout
- Select Development Tools
- Start Writing or Hire Developer
- Implement the Back-End Systems (if needed)
- Test and Release
Market Research
Doing market research is important to give you an idea of what similar apps are doing and how. Check out our market research article here.
Maybe you are designing a stand-alone App or need one to support your hardware product that needs a user interface, then you will most likely be needing to make an App as part of your product offering.
Typically, this involves a Web App and a Mobile App, since you will want your customer to interact with the product from any browser.
You will want to identify your App’s competitive advantages over other apps of the same type. Maybe your app does a better job, is easier to use, or has more features. Study the other apps in the store and see how many user reviews there are.
Many reviews means there is good demand for that type of app. So, build your app to differentiate for the features users are asking for.
Sketch it out
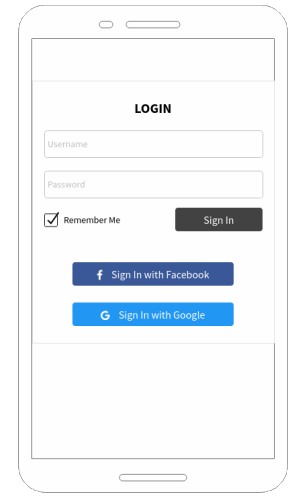
There are many ways to sketch out your app goals, functions, and pages. Pen and paper work fine, but there are online tools as well.
For example, mockflow.com has a free account and is easy to use (see sketch above). You can quickly construct the pages you want your app to have, just drag-n-drop the components you want, save it, then share this with your developer.
Even if you are writing your own app, sketching out the layout is critical to keeping your design goals in line, and it shows your developer exactly what your expectations are.
It will also point out issues or features you may have missed, and can save you time and money prior to starting development.
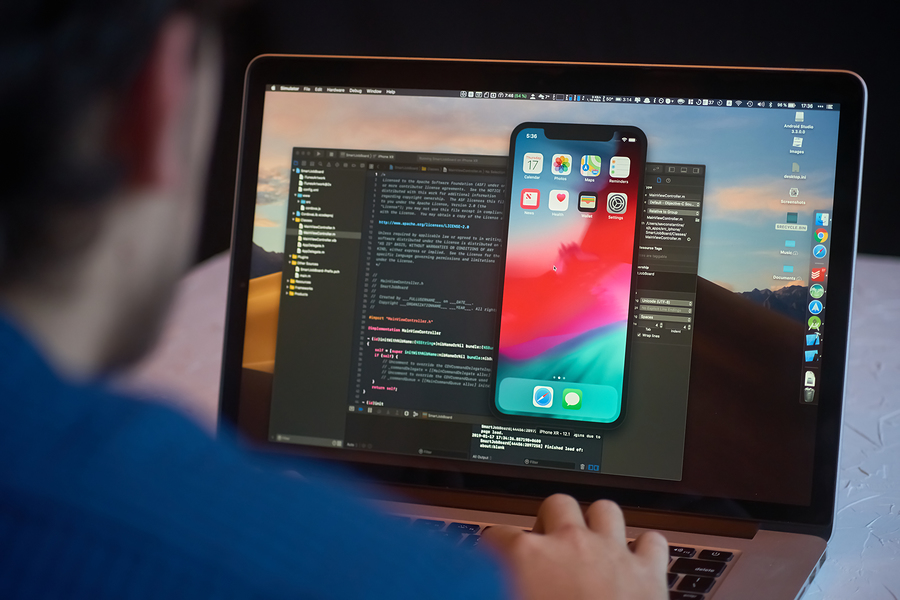
Creating the App
For a Mobile based App, there is iOS and Android. For Desktop/Web, there are many browsers that the user can choose from. If you need to create a native app, one that is specifically written for that phone, then you will need to write an app for iOS and one for Android.
This would require you to learn xCode and Java or hire a native iOS developer and a native Android developer, and a regular web designer for the desktop version. This can get very expensive, in both project completion time, and cost.
A Better Way
Luckily, there is another option to make an app. Since all mobile phones have internet browsers built-in and they all comply with the latest HTML, CSS, and JavaScript standards, there are development packages such as Ionic Angular/React that allow you to design one app and it runs on any of these platforms (and Ionic has a free version).
So, you would need to learn only one programming language, or hire just one developer fluent in HTML, CSS, and JavaScript (Ionic), to write your apps.
The UX/UI
Other important factors to consider is the look and feel of your App.
- Is it easy to use?
- Does it appeal to the user such that they will want to use it often?
- Does it have great features?
These design components of an App are what’s known as the UX or UI. User Experience, User Interface.
A good user experience and a responsive app is critical to your product or app’s acceptance in the market. When looking for a developer to hire, have them show you examples of full apps they have written. Is their app listed on the app store, what are the ratings and reviews.
The Code Repo
A Code Repository is a storage place on a server or the cloud where you can store the code, software, or just about any text based document you have.
Unlike normal backups, however, a code repo tracks changes in your software, so as you or your developer adds new features to the app, you “check-in” the code to the repo, and document the changes. If there was ever an issue or a bug popped up, you can always roll-back to the previous build.
Whether you write the app or hire someone, it is very important to use a code repo for all written code and resources.
You would create the account, GitHub is a great code repo, then give your developer check-in access to that repo. This way if your developer and you part ways, you have the code where the next developer can resume.
The Back-End
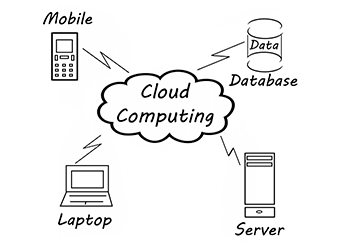
We just talked about the Front-End development (the user’s app or browser), but there is another part needed, the Back-End.
This is where the app communicates and stores/retrieves data. If you are making a hardware product, it may also need to communicate with the back-end to send and get its data.
The back-end systems or cloud servers contain the user database for orders, logins, etc. So, you will also need someone to write the back-end processes.
It’s typical that the front-end developer(s) can also manage the back-end development since they can use similar coding languages. This is called a Full-Stack developer, so hiring one full-stack developer can keep costs low, especially since you should try to get a minimally functional app as quick as possible.
Keep Costs Low
It is good practice to start off with the cheapest servers/cloud instance(s) that you’ll need to support your apps and product. It may take a long time for sales to grow enough to justify the infrastructure upgrade.
Then, you can add more horsepower, and geographical diversity to your back-end systems.
Having your servers in various geographical locations helps to reduce the downtime for not if, but when, one of your servers or datacenters has a problem.
You can rent a back-end server or VPS (Virtual Private Server) on the cheap, typically under $10 per month.
Amazon, Microsoft and IBM are just a few who offer VPS Cloud instances. I would recommend you stick with a VPS type server instead of Shared Hosting plans.
Shared hosting is more prone to slow and buggy server issues since they have so many customers on one server.
Launch Your App
Once you are satisfied with the look and features of your app, the next steps are uploading your app to the Play and App stores.
You will need to create an account for Google Play and Apple App Store, and agree to the terms and restrictions for age groups.
Apple requires a $99 yearly fee to join their Developer Program, Google’s fee is $25 one time. When your Developer accounts are active, you can upload your app. Once it is reviewed, you should see it listed on the stores.
Making the App Yourself
We just talked about the steps needed to create an App, and it is very doable if you want to write the front and back-end parts yourself. Maybe you can write the App (front-end), and get someone else to help with the back-end, or vice versa. Where would you start?
Meet Node.JS
Node.JS is an open-source, runtime environment that uses JavaScript as its language. Hence the JS on the end. I will refer to it as just Node.
It is lightweight, and runs on any platform: Windows, Linux, Mac, etc.
In the early days of the internet, there was just HTML, then came JavaScript. JavaScript was downloaded to your browser (along with the html) and allowed the web experience to be better, i.e. popups, active buttons, etc. It made the web page come to life.
So, JavaScript started out as a Client-side (front-end) scripting language for the browser. Now along comes Node, which is basically JavaScript for back-end servers. As mentioned above, the back-end servers are responsible for the logins, user database, etc.
Node, therefore, has the ability to talk to databases, like MySQL, MongoDB, etc. It can manage user Sessions, and handle hundreds of web connections per second.
Node is a powerful, versatile, cross-platform environment and I recommend you familiarize yourself with it by trying a few examples.
Since Ionic/Angular is based on JavaScript, and so is Node, you only need to learn JavaScript.
To get started, just download Node to your laptop or development machine and run it as your back-end server, and Node is also a pre-requisite for the Ionic/Angular platform.
The IDE
You can use many IDEs (Integrated Development Environment), this is basically the editor that lets you write, test, and debug the javascript code.
A good free IDE is VS Code. It can be used for both Ionic and Node development and has a Debugger also.
The VSCode site has a good tutorial on getting started writing your first Node server application.
Assuming you want to write your app using Ionic Angular, I will list those steps that will get you started.
Keep in mind, creating your app this way may benefit you in getting the basic functions of your app up quickly, and if you determine a native process is needed later, you can build an interface for it at that time.
- download and install NodeJS
- download and install Ionic framework
- run the your example ionic app, best to use existing sample app
- make modifications for your needs
What is a PWA
Another way to create an app is a Progressive Web Application (PWA). A PWA is an App that runs on your browser, either desktop or mobile, but looks and acts like a native mobile app.
Since the PWA is just a web app (loaded from a link, see below), you don’t need to upload it to the App Stores, just send the link to your customers, or post it on your website. Your customer doesn’t have to install a large app from the store, since the PWA is lightweight and full featured.
Ionic has all the parts and can easily convert existing apps to, or build a PWA (Progressive Web App). There are also a lot of Templates and Themes that you can use to quickly get your app skinned and save time.
See the following example of a PWA, click on it from your Mobile Phone. For Apple, click Share, then Add To Home Screen. For Android, just Add to Home Screen.
PWA Example
Next, close the browser page and open the app from your Home screen. Notice it looks and behaves like a native app.
PWA can access the camera too, using the Capacitor runtime plugin. Here is a screenshot showing the app: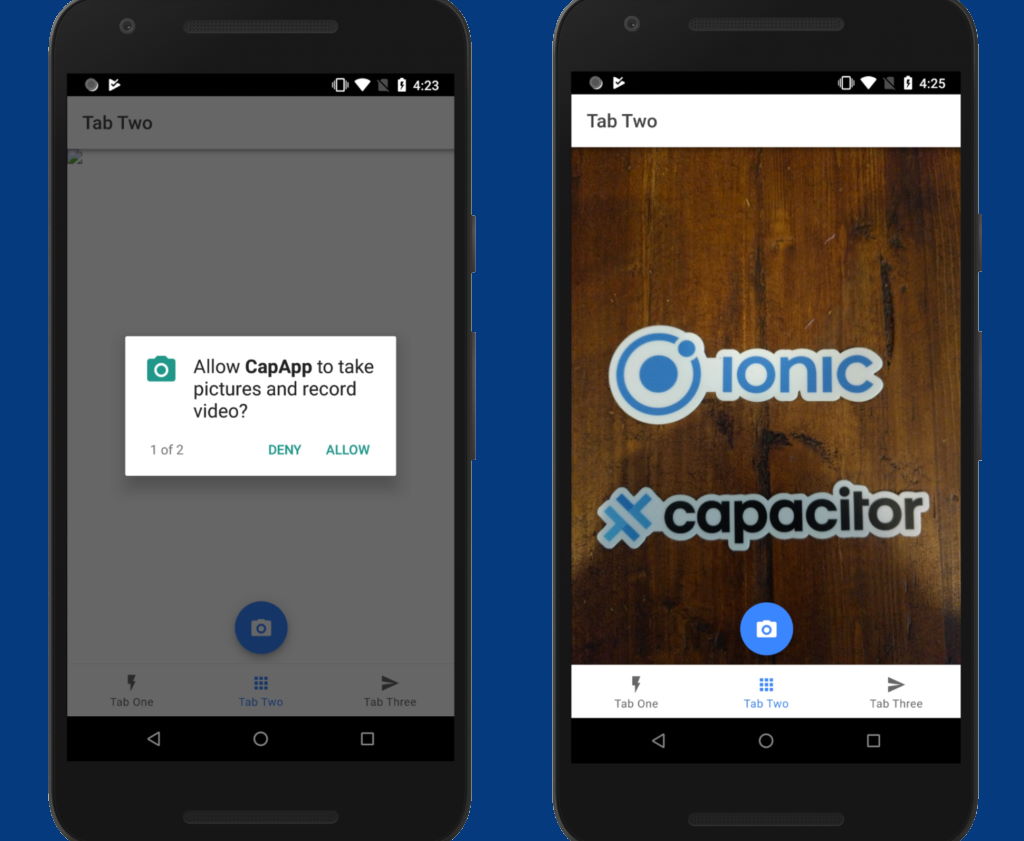
You can make changes in VS Code, and Save it and the changes will instantly show up in your browser, no need to refresh anything. Pretty cool. This makes developing your PWA very fast.
You can also write a native service, for example, an Android Intent Service that monitors the phones battery usage in the background and your PWA or Ionic App with Cordova plugin, can communicate with that native service via the plugins interface.
The Backend
For the back-end, we mentioned Node, and hopefully you have tried the tutorial and created your first server app. The great thing is, once you have your node server app written on your local machine, you can upload that code to a backend server host, or VPS, without changing any code.
This lets you test new code changes on your local dev machine before uploading it to your Production servers.
Here’s what is needed for the back-end:
- buy a VPS instance from AWS, Azure, IBM, or Google CLoud
- choose Ubuntu 16+, or similar as the Operating System
- verify Node is installed on your new VPS server
- create a small node app that listens for your app
- upload and run the app: ‘node yourapp.js’
Finding an App Developer
There are many ways to find a good developer for your app, but the one I use the most is a freelance service called UpWork. They have a Basic (Free) Plan, I recommend that. The virtual workers on there have a wide range of technical skills, just search for what you need.
However, you must be careful when posting a public job on any freelance platform because there are many scammers out there, and you will spin your wheels and waist time and money with them.
I will describe successful methods I use to find the best workers.
Post a Job
Once you are ready to hire someone, create a new job listing. Fill out the job and description and provide as much detail as you can. Post the app pictures from your concept drawings I mentioned above. Set the price as fixed or monthly depending on your goals. You may choose to keep the project Open ended since you may use them on an ongoing basis for that job.
This next part is important, when selecting which freelancer to hire, select Invite Only. You do not want to post your job to the public. This was what I did when I first started using Upwork and I got 10 scammers per 1 good worker and wasted a lot of time.
Once you post the job, you can now go searching for the workers to invite.
Invitation Only
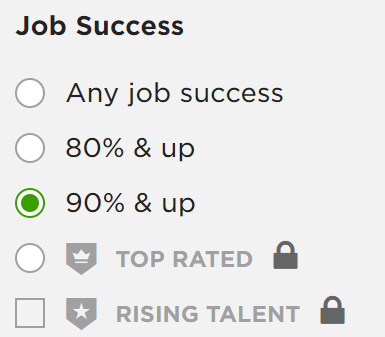
Type your job description in the search box, like: “ionic developer”. You should see a list of prospects. Next, on the left you will see a set of Filters you can use. Set the Job Success rating minimum, I recommend 90%. Then set the minimum Earned amount.
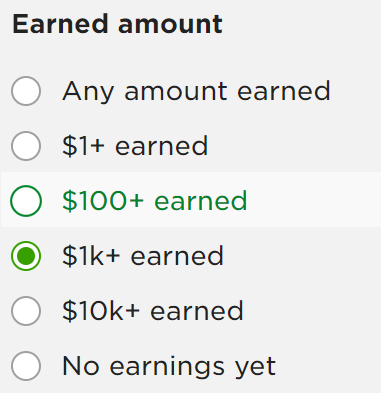
Now that you have a filtered list of workers with a high job rating and have earned some money, go through each one and look over their work history.
Do the jobs they’ve completed look similar to the skill set you require? If so, click Invite to invite them to your job.
They will follow up with a proposal and a description of their work. At this point you can open a chat session and discuss further, or a phone call can sometimes be better to get a feel for the person.
If the worker takes too long to respond to your job invite, that is usually a sign they are too busy. In my experience, the workers with a quick response, typically within a few hours or so, have a greater chance of getting your project done in a timely fashion.
Build for the Long Term
Another method you can try that I have found successful when I am wary of finding the right worker, is to post a tiny, simple job. For example, a small app that just has one page, talks to the server, and retrieves some data.
Then invite the workers you are considering.
This way you can judge how fast they are, the attention to the details of the job, and a general sense of how it is to work with them.
I have even posted a small job and invited several workers to compete, like a contest, and I mentioned it in the job description.
It is better to do this to find the right worker, developer, or engineer for your jobs, because you will want to build a long working relationship with them to use on future jobs you may have.
No Agencies
A note on Agencies or Firms, I don’t hire them for development work, or any freelance work for that matter, I only select individuals/freelancers to work on my projects. This is mainly because agencies always charge more due to the overhead involved, and they will typically take longer to finish your job. I’ve never had the best experience using them.
If you have a large project, however, you may need to consider an agency with high ratings, be sure to layout very clear expectations on time and cost for the deliverables. It’s better to go through each part of your job and hammer out the details before diving in.
How Much Does it Cost to Build an App?
The cost to build an app can vary greatly, but I can give you a baseline from my experience:
Here is an example job cost for an app I needed built recently that was for a new sensor product we made.
The app had a pop-out menu and 7 pages/screens: Login, Device List, Device Detail, Alerts, Account, Settings, and Help:
I expected 30 days to have a working app and back-end systems as well (User db, Device API, etc.) and set a weekly hour limit to 35.
Total hours: 121 x $40/hr = $4,840
The app was written in Ionic and the back-end was written in NodeJS and the database was AWS’s dynamoDB. In addition, as mentioned earlier, we used Guthub to checkin all the code.
This is meant as a reference comparison to show you an approximate cost for building an app including the back-end. Your costs may be higher or lower based on details of your job requirements.
How Do Apps Make Money?
There are a few ways apps can make money:
- You can charge a fee for your app in the app stores, or an upgrade from the free/demo version to a pro version.
- You can make a free app but show Ads in your app. This way you will make money when users click the ads.
- You can also charge a subscription for your app or service. Perhaps you have a product to sell and the user needs and app to use the product, but you can charge for the product’s data subscription.
It is very common for apps to offer a free version and show ads to the user, but offer a paid upgrade (maybe a one-time fee) for the Pro version with no ads and more features. If your app is simply a gateway to use your service, take Uber, for example, then you should make your app free because you make money when people use your service.
If your app is very specialized, or offers a unique service, you may want to charge a fee for your app.